
配置 WSL 开发环境
2022-11-10
背景
安装步骤
启用虚拟化和WSL
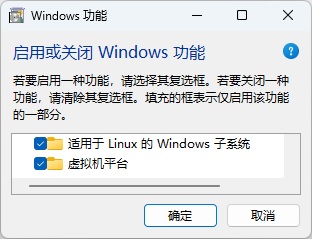
完成之后需要重启。
启用WSL
1 | wsl --install |
完成之后可能需要重启。
安装Windows Terminal
在 Microsoft Store (应用商城)中搜索 Windows Terminal 即可一键安装,此处省。
安装Ubuntu
有多种方式可以安装 Ubuntu。最简单的方式,就是和上一步一样,在 Microsoft Store (应用商城)中搜索 Ubuntu 即可一键安装,此处省。
配置 apt 国内软件源镜像
1 | sudo cp /etc/apt/sources.list /etc/apt/sources.list.20221110.bak # 备份是个好习惯 |
因为我在上海,使用的又是 Ubuntu 22.04,所以我的配置如下:
1 | deb https://mirror.sjtu.edu.cn/ubuntu/ jammy main restricted universe multiverse |
初始化
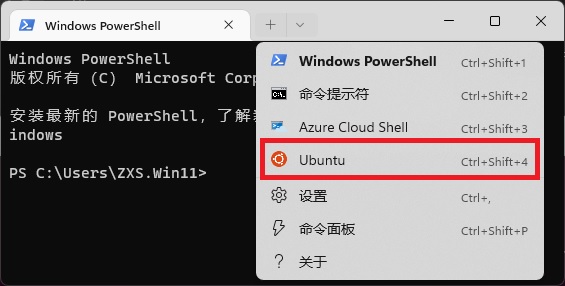
安装完成之后,打开 Windows Terminal,选择 Ubuntu:
第一次打开会提示设置用户名密码(超级用户权限)。
Windows 环境必要软件安装
根据各开发者技术栈不同,需要安装的软件会有所不同。包括但不限于:Docker Desktop、Visual Studio Code、Remote Development Extension Pack
WSL 环境必要软件安装
根据各开发者技术栈不同,需要安装的软件会有所不同。包括但不限于:git、node.js、python
GitHub 访问加速
其实,现在好多办法都可以加速访问 GitHub,我这里介绍一种特别原始的办法,就是修改 hosts 文件。
- 以管理员权限,打开记事本
- 记事本中打开
C:\Windows\System32\drivers\etc\hosts文件 - 添加以下 IP 映射:
1 | # 需要定期更新如下代码 |
- 运行命令
ipconfig /flushdns刷新 DNS。
当然,也有其他的提供最新 hosts(比如 https://raw.hellogithub.com/hosts ) 或者自动 switchhosts(比如 https://github.com/oldj/SwitchHosts ),或者镜像 github 网站,或者其他科学上网方式,感兴趣的请自行搜索。
Github SSH 配置
- 生成 ssh 公钥和私钥(如果没有的话) Generating a new SSH key and adding it to the ssh-agent
- 添加公钥至 Github 账户 Adding a new SSH key to your GitHub account
- 更改 Repository 至 SSH 协议。
1 | # Deployment |
参考链接
- Install Linux on Windows with WSL
- 上海交通大学 Linux 用户组 软件源镜像服务
- Set up a WSL development environment
- GitHub Hosts | hosts
本文链接:
content_copy https://zxs66.github.io/2022/11/10/setup-wsl-development-environment/